How to Build a Polished and Professional IVR
What is an IVR?
While the acronym may be unfamiliar, IVRs are nearly a ubiquitous part of life. IVR is short for Interactive Voice Response, and it is the automated answering service used by many businesses. While a poorly designed IVR can be frustrating, a well polished one can actually add value to the customer’s experience. Before we look at the actual building of the IVR, let’s look at some initial planning and conception steps.
IVR Design Concepts
First and foremost, we need to keep the actual user in mind and build the system around the customer’s needs. There are several areas where we can make a concerted effort to make that happen.
The Script
Designing your IVR for your customer starts from the beginning. When selecting a voice for your IVR, make sure to pick one that matches your company image and customer demographic. Keep the dialogue friendly and concise while using language that will sound natural to your customers. Professional or semi-professional voice talent is recommended for your IVR recordings. Though it is easy to do your own, you can obtain semi-professional to professional level voice over services for minimal cost on sites like Fiverr.com.
Also important is how much you say. For example, keep the introduction short – no more than eight seconds. Don’t include lines like “please listen carefully to the following option as our menu has changed.” Since most customers won’t be familiar enough with your menu to know or care that the options have changed, these lines only add unnecessary length to the intro. Also, refrain from adding any marketing or branding messages. These are customers that are already aware of your company since they called you. Additionally, keep descriptions of menu choices to five seconds or shorter. Not only does keeping things short help keep customers happy, it also makes getting voice talent cheaper.
The Menu(s)
When constructing menus, there are more steps we can take to keep things customer focused. Keep menus trimmed down to no more than five options on any given tier, fewer if possible. Too many options can be difficult to remember. Where we place menu options is also important. If we know that 80% of the calls we receive are for support, then our very first option should be to connect to the support team or menu. Don’t go more than three tiers deep when creating additional menus so that customers don’t have to dig too far to get to the options that they need. Too many menus can make customers confused.
One more thing that we need to recognize in our menus is that IVRs make some customers very frustrated. It is a good idea to have ways to opt out of the IVR. One recommended practice is to give an option for an operator or a receptionist in every menu. The goal to keep in mind is to make sure our customers get the help they need as quickly and easily as possible.
Planning & Architecting the IVR
Now that we have the basic design concepts, it’s time to start planning things out. This is likely to be the longest and hardest part of the process for most companies. Let’s take a look at several key aspects that we have to figure out before we can build the IVR.
After-Hours & Holidays
If we are not running a 24×7 business, and many times even if we are, our IVR will be most effective when it is configured to match our normal business hours. We have several options on how to present this to our customers. The simplest approach we can take is to merely change the recording while leaving all the same options intact. Alternatively, we can create an entirely separate menu for the off hours. This can be used to provide a limited after-hours support menu, a menu that leads only to voicemail, or a message leaving a number for after-hours emergencies. A similar approach can be used on holidays.
The info we will need here is when we want off hours to start and end and the company holidays in mm/dd format. We will also need to know if we are going to just change the message for off-hours calls or if we are going to build separate menus. If we are building separate menus, we need to know what options our additional menus will have.
Hunt & Agent Groups
Menus are only as good as the options to which they connect. Sometimes a menu connects to another menu. These connections, however, offer no value to our customers. We need to plan out how our customers will interact with our company’s employees. The most efficient way to accomplish this is through agent and hunt groups. While there are some differences, which lay beyond the scope of this post, there are some bits of information we will need no matter which we choose. We have to determine what groups we need. We also want to know which extensions go in which groups.
Miscellaneous IVR Options
After off-hours and groups, we should decide on other options we want our IVR to support. How can callers input an extension? Are there extensions that we don’t want accessible from the IVR, like the CEO’s desk phone? If we want to have a dial by name directory, we need to know how many digits we need before the system attempts to find a match. We also should know how many times the recording should repeat and what it should do if it doesn’t receive any input from the caller even after the set number of repetitions. Once we have all of the relevant information, we are ready to move forward.
Building the IVR
Now, on to actually building the IVR on Voonami’s hosted VoIP platform. Voonami includes management with the service. This means that the easiest way to build your IVR is to simply to call or email our team. We will work with you to iron out the details and build the IVR according to your needs. If you want to do the work yourself, that option is also available to you. Just let us know that you would like to do it yourself. You will need to let us know how many separate IVR menus, hunt groups, etc. you will need so that we can build them on the back end for you.
Step 1: Setting Service Flags
After logging in to our hosted VoIP portal with our admin account, we select “+ More” from the list on the left, and then “Service Flags”. Now, we select the one we want to work on and we should be met with the following screen.

If we wanted the night service flag above to also be used for holidays, we would just add the dates, in mm/dd format, in the “Holidays” field. The system will activate the service flag on the dates provided regardless of the day of the week. If holidays are entered in the flag above the system will treat holidays exactly the same as any other off-hour call, including the same options and the same recorded message. If we want to have a different message or a different menu for holidays, they will have to have their own service flag(s) set up.
Step 2: Setting IVR Options
Next, let’s go to the “Auto Attendant” section and select the one we want to work on and we should see the screen below.

From here we input our options according to the information we gathered previously. If we want the menu we are in to correspond directly with a specific service flag, then we would enter the account in the “Service flag account:” field under “Night Service”. Otherwise, we will leave that field blank. Scrolling down we have the section used to build out menu options.

If we are not doing custom recordings then we need to select the appropriate phrase from the second column, otherwise, simply leave no playback. The destination field should be the number for the hunt group, agent group, IVR, or extension called via the input on the left. The subsequent field will auto-populate after saving the changes to the page.
Step 3: Uploading and Setting Recorded IVR Messages
As a final step, we need to upload our recordings. In the grey bar across the top, select “IVR” so that we can see the following screen:
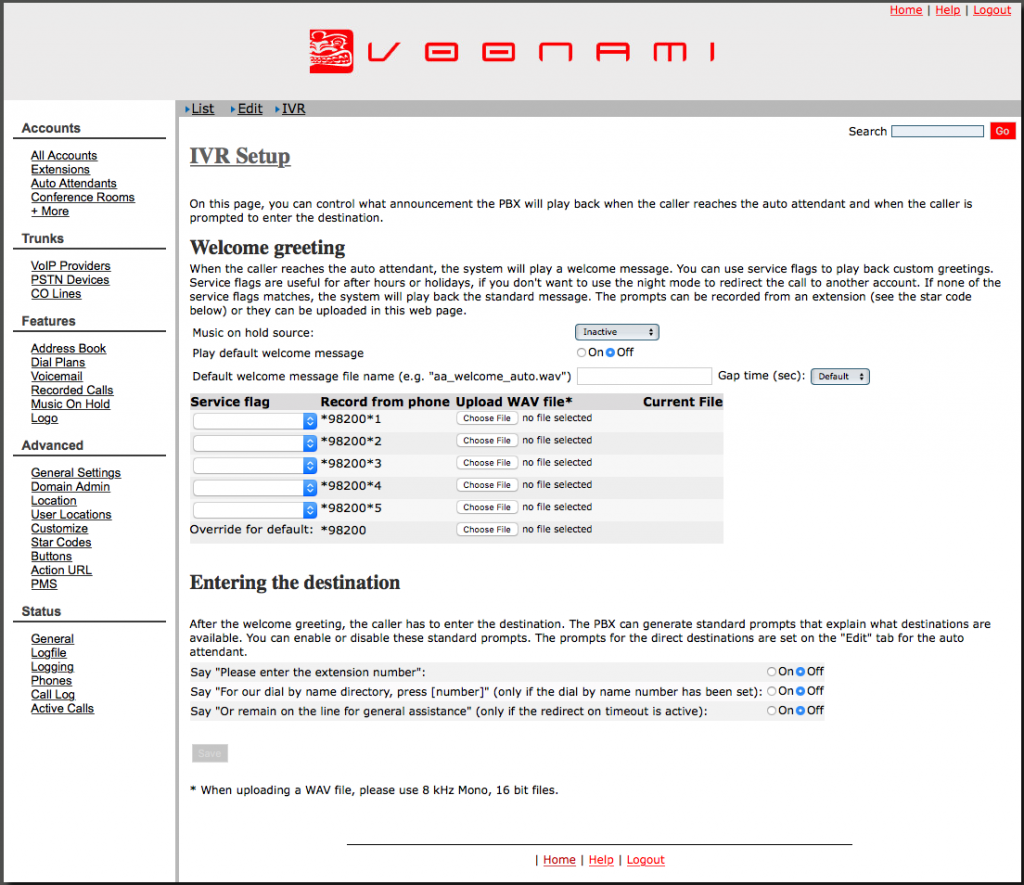
Here we can change the default recording to our new standard message. As desired, we can also use service flags to change recordings while leaving the menu options and IVR behaviors unaltered. Once our recordings are in place, our IVR is finished.